 |
|
 | POWERPOINT ENHANCEMENT SOFTWARE |
|
|
|
|
 | |
 |
POWERPOINT MEDIA PRODUCTS |
|
|
|
| |
|
|
|
|
|
|
| SHOPPING CART |
 |
|
 | |
|
POWERPOINT HELP |
|
|
|
|
|
|
|
|
|
| |
|
|
|
|
|
 |

January 17, 2008 Edition Nr: 005
|
What is Microsoft Producer 2003?
Well, simply put, Microsoft Producer 2003 is the latest version of the popular add-in for Microsoft Office PowerPoint 2003, and your way to produce online media rich fully interactive engaging presentations.
Offering an array of tools that make it easy to create, edit, synchronize, and publish rich-media presentations that can be viewed anytime in a users Internet browser, Microsoft Producer has grown since its early and primitive release to provide a platform for presenters to develop and deliver engaging presentations, training, and business communications.
Where we are
In the first part of our Producer 2003 tutorial, we discovered how users of PowerPoint can use Producer 2003 to produce more dynamic and interactive presentations, and in doing so we gained overview of the application interface, and how to:
- Import Audio.
- Import Video.
- How to add Images, Slides, and HTML.
- How to capture Video, Audio, Images, and other screen content.
Whilst in part two of our Producer 2003 series of tutorials, discovered how to:
- Edit Video in Producer 2003.
- Add Video transitions.
- Add Video effects.
- Synchronize audtion and video with slides and images.
In this, our third and final tutorial of the series, we will examine how to:
- Choose a Producer 2003 presentation template.
- Preview a Producer 2003 presentation before publishing it.
- Publish a Producer 2003 presentation to a local drive or network share.
- Publish a Producer 2003 presentation to a Web server, or combination Web server and media server.
For readers joining us for the first time, I do recommend reading the first part of our Producer 2003 tutorial to become acquainted with the application before progressing further. As well as reviewing part two of our Producer 2003 tutorial to learn more about editing, using, and synchronizing video and sound files to your slides and PowerPoint presentation.
Microsoft Producer 2003 is free for all registered users of Microsoft Office PowerPoint 2003 and 2002.
To download Producer 2003 and follow this tutorial, click here.
|
Choosing a Producer 2003 template |
Producer templates can be changed throughout your presentation to underline and maximise various aspects and areas of your presentation.
To change the presentation template, simply choose Presentation templates from the tree pane, or select Presentation templates from the Tools menu.
|
|
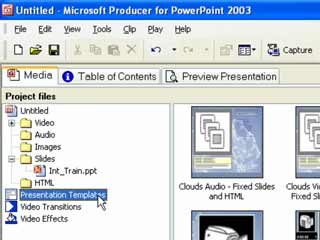 |
Selecting a Presentation template from the tree pane
|
|
After selecting Presentation templates, you will see a selection of templates to choose from in the center pane.
To apply the template that you want to your entire presentation, or to just a segment or part of your presentation. Click on the template you want and drag the template onto the template area of the timeline.
|
|
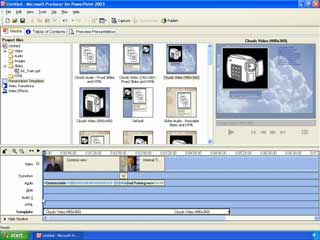 |
A selected Presentation template is dragged onto the timeline
|
|
With your selected template now on the timeline, you can adjust the duration of the template to last for either the length of your presentation, or for a specific segment of it.
To adjust the duration of the Presentation template, click on one end of the horizontal bar in the template timeline, and drag the end to the start, end, or edit point of where you wish the template to end.
.
|
|
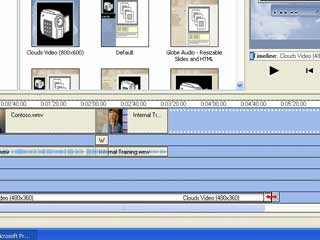 |
Adjusting the duration of the selected Presentation template
|
|
Additional templates can be added and edited to your presentation in a similar fashion.
Although you can drag and drop a template to any point on the timeline, dragging it near the transition of two video or audio clips will cause it to snap to the transition point, making synchronization of template and media clips much easier.
|
|
 |
Using an additional template, it is dragged to a video transition
point to enhance and synchronize with media edits
|
|
Click here to continue to page 2 of the tutorial and learn How to Preview your Presentation before publishing.
|
|
 |


|
|
|
|
|
|
|
|