 |
|
 | POWERPOINT ENHANCEMENT SOFTWARE |
|
|
|
|
 | |
 |
POWERPOINT MEDIA PRODUCTS |
|
|
|
| |
|
|
|
|
|
|
| SHOPPING CART |
 |
|
 | |
|
POWERPOINT HELP |
|
|
|
|
|
|
|
|
|
| |
|
|
|
|
|
 |

February 01, 2008 Edition Nr: 006
|
Transparency in PowerPoint
Each week we receive many mails from readers who import their logo or graphics into their PowerPoint presentations only to find a dreaded white box surrounding the graphic that they instead would rather have sit ontop of their PowerPoint Template or background design.
As a result of the "bounding box", the graphic tends to look very much out of place, and worse still, as though it is a pop up graphic, or some element of clip art, lowering the standard and quality of the presentation that the presenter wishes to achieve and project towards their audience.
What exactly is tansparency?
Transparency is the ability to make an area of a graphic transparent, or perhaps put more simply, invisible.
Users of graphic applications such as Adobe PhotoShop, and Illustrator, are used to the concept of working with layers and the ability to place images on top of each other to create more interesting compositions.
Using transparency on for example the background of an image, makes it possible to create an effect where the layer appears as a part of the underlying graphic.
We often see this effect in the movies and films that we watch, referred to as the term "Blue Screen", or "Green Screen", as more modern techniques prevail.
Uses of transparency
Of course transparency need not only be applied to the background of an image. It is possible to make any color of an image transparent. Such as the sweater of a child, or the hair of a man. If you ever wondered how you would look without hair, you can use transparency to see!
There are many uses and forms of transparency. From a more complex technique called "Alpha Channel", to simple pixel selection such as the forms of transparent .GIF's.
Each variation and transparency technique, has it's own advantages and disadvantages, and will affect your use of them on your graphic in order to achieve the desired result.
In our tutorial
In today's tutorial, we shall examine how best to import a bitmap graphic image, such as a JPEG, BMP, PCX, PCT, TIFF, GIF, or TGA graphic file, into PowerPoint and achieve a transparent effect. To create a seemless join between the graphic and the background of your PowerPoint Template.
Getting Started
When you insert a bitmap graphic into PowerPoint, PowerPoint determines the dimensions of the image by its width and height and imports this square or rectangular shape into PowerPoint.
Regardless of whether you graphic is for example a round badge in the center of the square. PowerPoint determines the size of the graphic as a four sided object.
There are two ways to make the background of your imported graphic transparent.
- PowerPoint's inbuilt transparency tool
- Include the transparency information (Alpha Channels) in your graphic file, before importing it into PowerPoint
The vast majority of graphics will be able to achieve a fairly suitable result using PowerPoint's inbuilt transparency tool, however, for true precision, adjusting your graphics Alpha Channels prior to importing will most likely be required.
Let us begin by importing our graphic and testing PowerPoint's transparency tool to see if th results are accpetable.
|
PowerPoint's Transparency Tool |
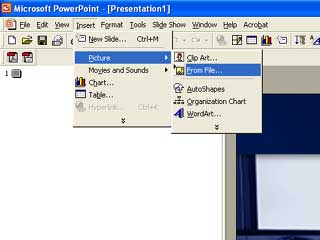
Opening your PowerPoint presentation, import your graphic from the File menu.
Select Insert from the File menu. On the pull down menu then select Picture followed by From File and double-click to browse your local or network drives for the graphic you wish to import.
|
|
 |
Import the graphic into your PowerPoint presentation
|
|
After importing your graphic, PowerPoint will automatically center the graphic in the middle of the slide.
|
|
 |
Your graphic is imported
|
|
Sadly our sample logo is oval shaped, so the remaining space, so PowerPoint inserts a white background that fills the remaining rectangle of the imported graphic.
Now we have a logo that looks very stuck on, and not at all as a part of the design of the presentation, so we must remove the white background of the graphic and enable transparency.
Right click the imported graphic, and select Show Picture Toolbar .
A toolbar appears.
Select the Transparency tool icon, the second icon from the right.
|
|
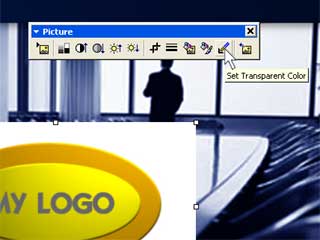 |
Selecting PowerPoint's transparency tool
|
|
When you click the transparency icon, the cursor transforms into the icon.
Click on a part of the image that you wish to make transparent. In this case, we wish to remove the white background on the imported logo graphic.
|
|
 |
The white background behind
the logo graphic is made transparent
|
|
Whilst the results are vastly improved, on closer inspection, we can see that not all the white background has been removed.
These remaining "artifacts" are the results of "Anti-Aliasing", a technique employed by applications to "smooth" the edges of graphics by adding a transition between the edge of the graphic and its background.
|
|
 |
After using the PowerPoint transparency tool an
anti-aliased edge still remains on around the imported graphic
|
|
In this case, as our background was white, a fine edge of off-white pixels was created by the graphics program to smooth the harshness of edge of the graphic and its background.
When we used PowerPoint's transparency tool it simply removed all the white pixels and the anti-aliased edge still remains.
Of course our problem is that our presentation background image is not white. Its is blue, so the anti-aliased edge is very dominant, and looks as though it is the result of poor "cutting and pasting" of the graphic.
Whilst for many the results thus far may be adequate, especially if the background of the presentation is itself white, for many, the anti-aliased edge represents an unwanted and distracting edge that must be removed. And to do so, we must look towards the Alpha Channels of the graphic.
|
Click here to continue to page 2 of the tutorial and learn How to Adjust the Alpha Channels of your Graphic Images.
|
|
|


|
|
|
|
|
|
|
|